Delivering outstanding customer support is paramount in establishing strong and lasting relationships with your valued clients As a newcomer to Zoho Desk, an all-encompassing customer support software, you've taken a decisive stride toward enhancing your support operations. To empower you with the knowledge and tools to extract maximum value from this powerful platform, we've curated a collection of the top 5 Zoho Desk tips specifically catered to new users.
This support application presents an array of features and functionalities meticulously crafted to streamline your support processes, amplify agent efficiency, and provide unparalleled service to your esteemed customers. Within this blog post, we'll delve into essential tips and best practices tailored for new users. By implementing these tips, you will be primed to optimize your support operations, reduce resolution times, and forge an unforgettable experience for your cherished customer base.
Tip #1: Set Up Zoho Desk for Ticket Management
Configuring ticket management is essential for ensuring efficient and streamlined support operations. With Zoho Desk's ticket management features, you can set up automated workflows, assign tickets to the right agents or teams, and prioritize them based on predefined rules. Ticket automations allow you to create rules that automatically trigger actions such as assigning tickets, changing ticket statuses, or sending notifications based on specific conditions. This ensures that tickets are routed and handled promptly, reducing manual effort and improving response times. Additionally, with customizable ticket views, you can organize and filter tickets based on different criteria such as status, priority, or agent assignment, providing agents with a clear overview of their workload and enabling them to focus on high-priority tasks. By effectively setting up ticket management in Zoho Desk, you can optimize your support processes, streamline ticket handling, and provide timely resolutions to your customers.
Getting started on Zoho Desk:
Step 1: Organize Your Help Desk
Departments play a crucial role in optimizing ticket management on Zoho Desk. By assigning department-specific agents and setting up separate mailboxes, social media channels, and community forums for each department, you can efficiently manage customer conversations. This segmentation enhances collaboration, ensures inquiries are handled by the right experts, and provides a focused support experience. With dedicated communication channels, agents can address department-specific inquiries without confusion or clutter. By adding departments, your streamline support operations and deliver targeted assistance to customers.
Step 2: Set Up Email Channel
Once you're done adding departments, you need to set up a channel through which your help desk can receive tickets. Setting up the email channel is essential to seamlessly integrate customer emails into your account. By configuring email forwarding or connecting your existing email account, you can centralize all customer communication. This enables agents to receive and respond to customer inquiries directly from the help desk, ensuring a streamlined and unified support experience. Authenticating your response email address is the last step before you are able to respond to incoming emails and tickets, and track all email conversations with your customers.
Step 3: Onboard Your Team
To successfully onboard your team onto Zoho Desk, you need to create agent profiles, define their roles and permissions, and provide necessary training. Zoho Desk offers user-friendly agent interfaces and collaboration tools, allowing agents to access and manage tickets effectively. Once you've invited your agents to the system, you can start granting them access to certain departments and modules. Please note that classifying agents under departments will come in handy when you want to use automation rules to assign tickets.
Step 4: View Tickets
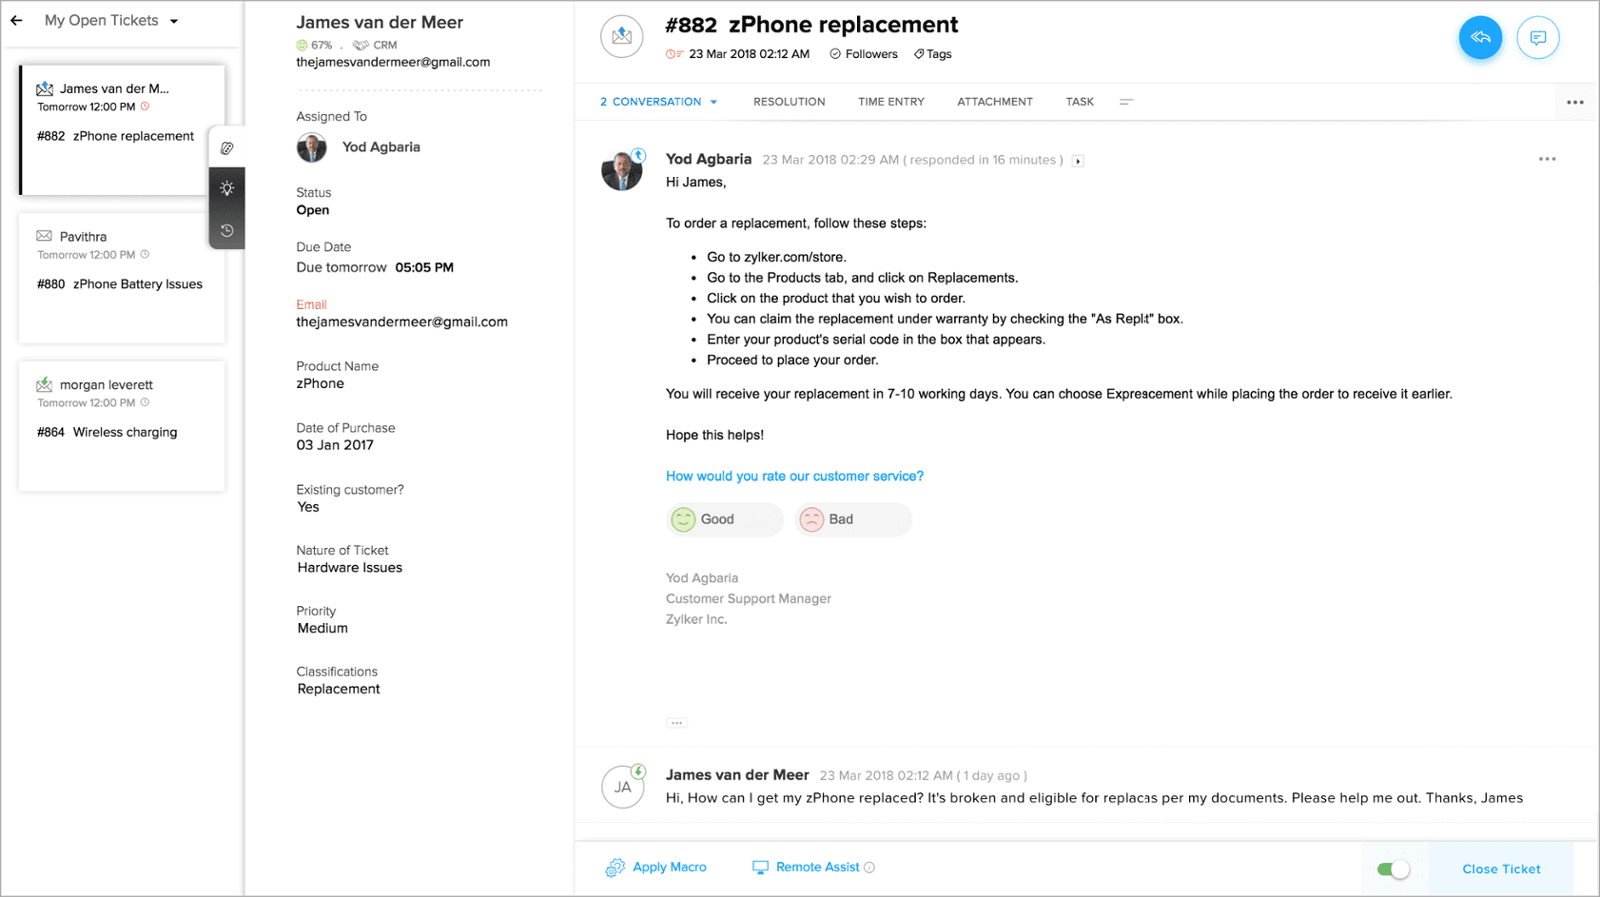
The ticket interface has two panes, and it provides you with the context you need before responding to a ticket. The bigger panel contains all the information about the ticket which you have opened, like the associated channel, ticket ID, description and the date and time the ticket was created. You can forward or reply to the ticket from the response editor in the same screen. You can also track your productivity by running the on-screen timer manually.
The smaller pane has four widgets with features that make your work a whole lot easier:
- The first widget displays ticket properties like customer details, date and time the ticket was created, status and priority of the ticket.
- The second widget is the AI-powered reply assistant. Based on the contents of a ticket, Zia, your personal A.I. assistant, suggests appropriate responses. You can reply to your customers by simply clicking on the suggested response without having to type one manually.
- The third step introduces a helpful widget that displays relevant help articles from your Knowledge Base based on the ticket content. With this feature, you can easily access and utilize the most applicable help article by simply clicking on it to paste it into the response editor. This time-saving functionality eliminates the need for agents to conduct extensive research, enabling them to provide prompt and accurate responses to customer inquiries.
- The fourth one is the timeline widget. Here, you can see all the previous conversations you have had with your customer. This will help you understand your customer's journey and gauge the actual priority of the ticket.
*New Extension: Sentiment Analysis Extension analyzes and scores the sentiment of each ticket, letting support agents know whether the customer is happy or sad, so they can deliver better value during the interaction. Sentiment scores can also be determined for agents' comments to help management assess the service they provide.
Step 5: Respond to Tickets
When a ticket is submitted by someone who is having a problem, your email server will forward that email to Zoho Desk, where then you can view the ticket. Replying to this ticket is as straightforward as sending an email using your preferred email tool. Agents can craft personalized responses, add internal notes, or use pre-defined responses to address customer inquiries efficiently. With collaboration features like @mentions and internal discussions, agents can seek assistance or share insights with their team members, enabling prompt and accurate ticket resolutions.
Step 6: Measure Customer Satisfaction
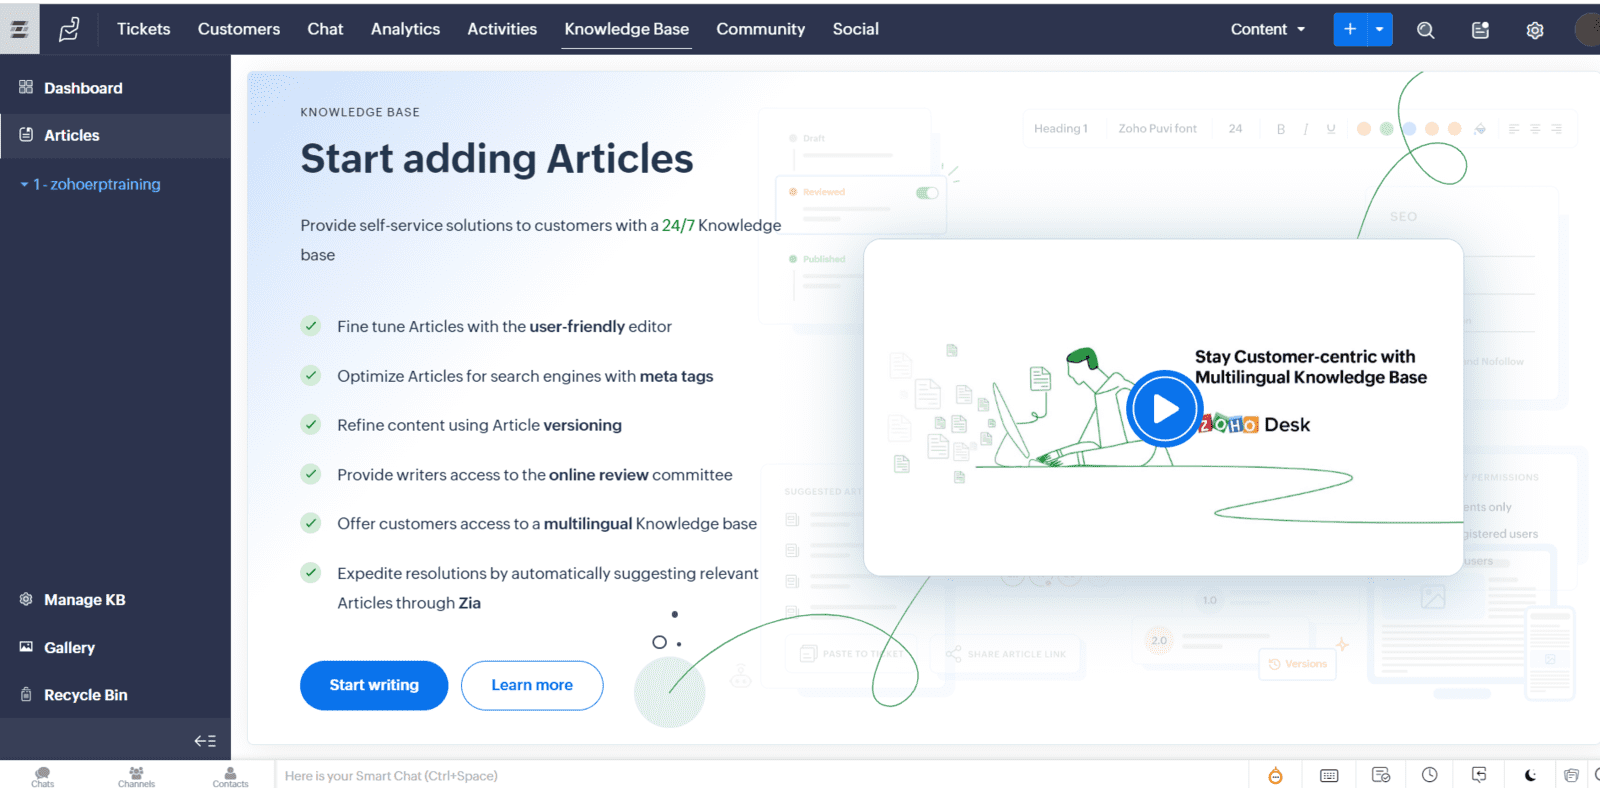
Tip #2: Implement Knowledge Base
In Zoho Desk, implementing a knowledge base is made easy with features such as categorized articles, article approval workflows, and search engine optimization. Categorized articles provide a structured way to organize and present self-service information to your customers, making it easier for them to find relevant solutions. Article approval workflows ensure that knowledge base content goes through a review process, maintaining the accuracy and quality of the information provided. Leveraging search engine optimization features helps improve the discoverability of your knowledge base articles, enabling customers to find answers through search engines. By leveraging these robust knowledge base capabilities, you can empower your customers with self-service options, reduce support ticket volume, and provide accurate and accessible information to enhance their support experience.
Tip #3: Optimize Response Templates
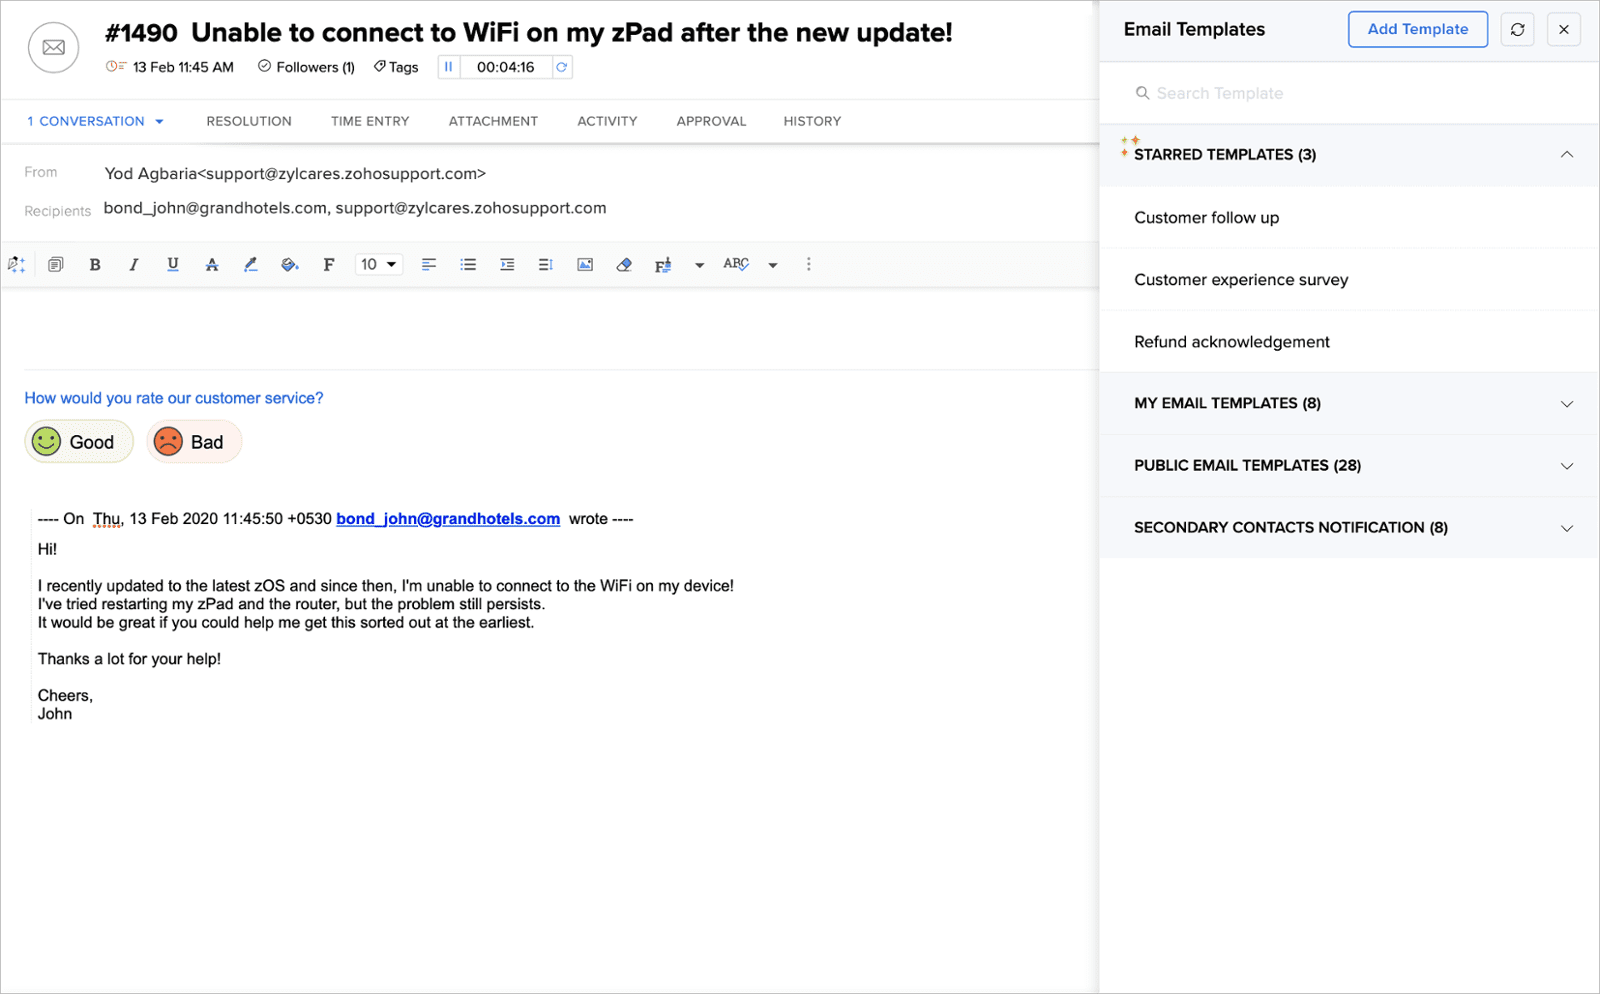
Zoho Desk's resource templates provide a valuable tool for delivering consistent and efficient support. With this feature, you can create predefined responses, solutions, or instructions for common customer queries or issues. By using resource templates, agents can easily access and provide accurate information, ensuring consistent and high-quality support interactions. Zoho Desk allows you to customize resource templates with variables, enabling you to personalize responses by dynamically populating ticket-specific information. Regularly updating and optimizing resource templates ensures their relevance and effectiveness, providing agents with a valuable resource for delivering high-quality and efficient support.
On the right panel for the picture below, you can see the templates that are in the system. Simply choose which one you want to use and carry on without having to manually write a common email over and over again. This can save you a ton of time and allow you to focus on making your customers happy.
Tip #4: Utilize Automation
Automation and macros are powerful tools for streamlining support processes and improving agent efficiency for any system that saves you time. Automation allows you to set up rules and triggers that automate repetitive tasks, such as ticket assignment, status updates, and notifications. This eliminates manual effort, reduces errors, and ensures consistent and timely support. Macros, on the other hand, enable agents to save time by applying pre-defined responses or performing bulk actions on multiple tickets simultaneously. They can be used for common support scenarios, allowing agents to respond quickly and consistently to customer inquiries. Leveraging automation and macros optimizes agent productivity, expedite ticket resolution, and provide efficient and consistent support to your customers.
Here are some specific automations that you can setup and implement on Zoho Desk. If you need any assistance setting these up, schedule a free appointment to discuss how we can implement these workflows to your business.
Ticket Routing: Automation rules allow you to automatically assign incoming tickets to specific agents or groups based on criteria such as ticket type, category, or customer location. This ensures that tickets are routed to the right team member, improving efficiency and response times.
Ticket Escalation: Define escalation rules based on factors like ticket priority, status, or time elapsed. When a ticket meets the specified criteria, it can be automatically escalated to a higher-level support agent or supervisor to ensure timely resolution.
SLA Management: Set up Service Level Agreements (SLAs) and automate their enforcement. You can define response and resolution time targets for different ticket priorities and categories. When SLA deadlines are approaching or violated, notifications can be sent to agents or supervisors, ensuring adherence to service standards.
Email Notifications: Configure automated email notifications for various events such as ticket creation, assignment, status changes, or customer replies. These notifications keep your agents and customers informed about ticket updates, reducing the need for manual communication.
Customer Satisfaction Surveys: After resolving a ticket, you can automate the sending of customer satisfaction surveys to gather feedback. Define when and how these surveys are sent, and you can track and analyze the results to identify areas for improvement.
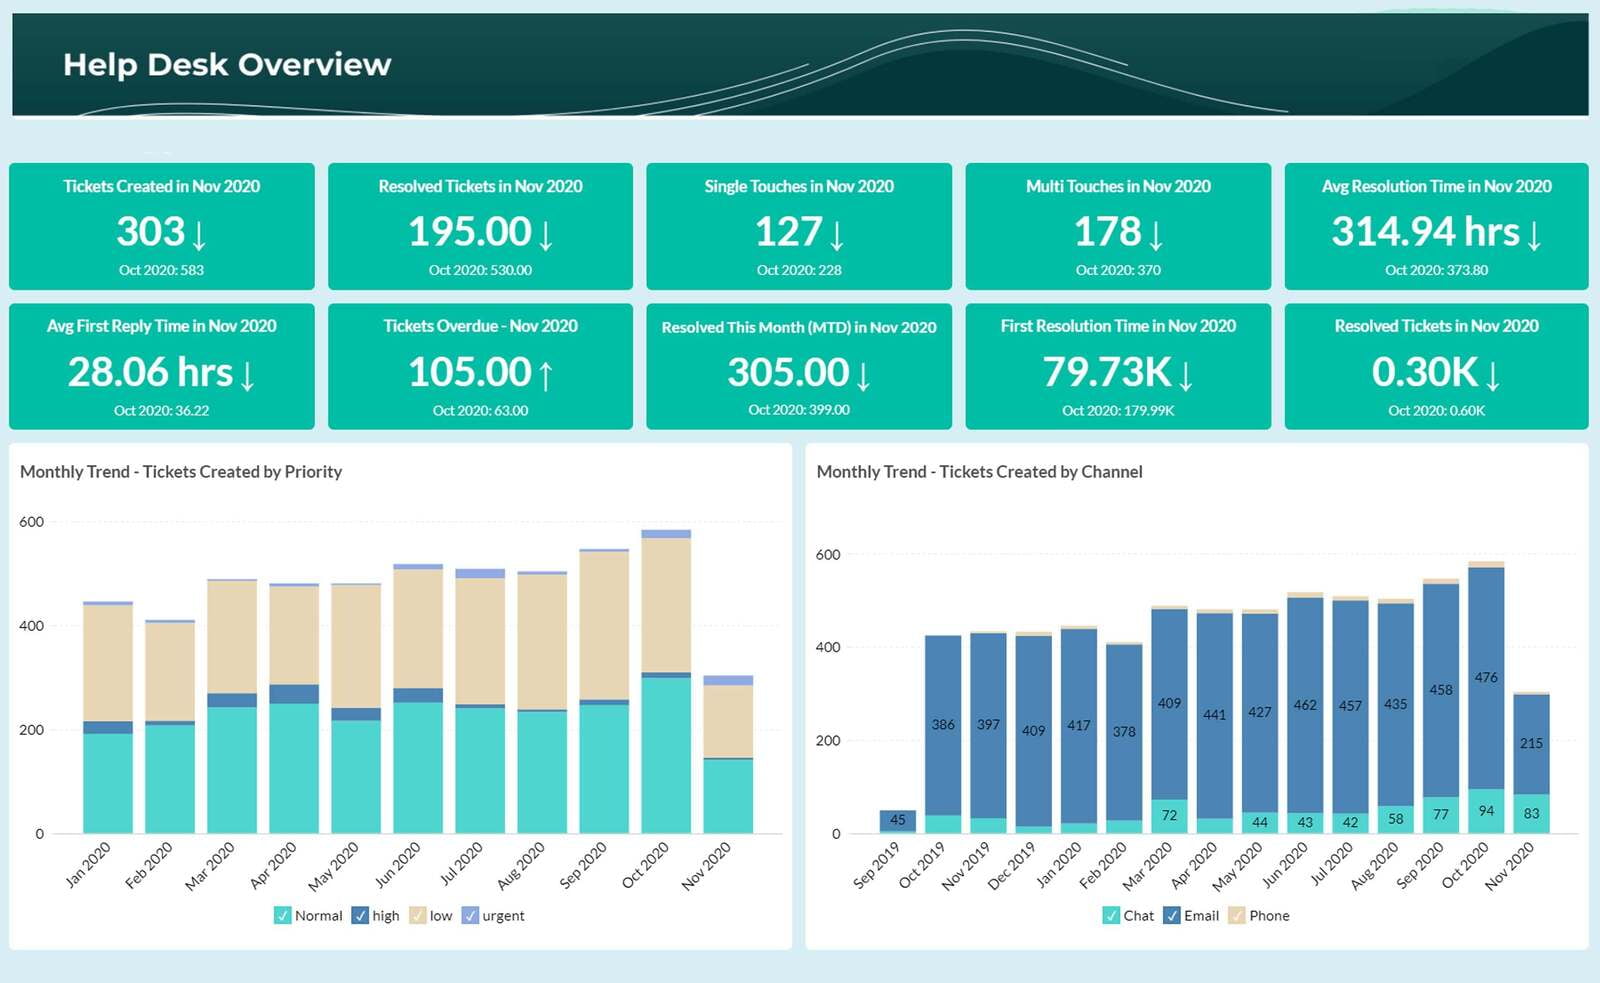
Tip #5: Analyze Reports & Metrics
Zoho Desk's reporting and analytics features offer powerful insights into your support operations. With built-in reports and customizable dashboards, you can track key metrics such as ticket volumes, response times, customer satisfaction ratings, and agent performance. These insights enable you to identify trends, monitor the effectiveness of your support strategies, and make data-driven decisions to continuously improve your support operations. With the comprehensive reports and visualizations provided by Zoho, you can gain a deeper understanding of your support performance, identify areas for improvement, and allocate resources effectively. In return, by leveraging the reporting and analytics capabilities in Zoho Desk, you can optimize your support processes, enhance customer satisfaction, and deliver exceptional support experiences.